Customizing Neofetch with Randomized Custom ASCII Art 🎨
Neofetch is a beloved tool for displaying system information alongside beautiful ASCII art in your terminal. But did you know you can customize it with your own artwork, add custom color schemes, and even randomize the result every time you open a terminal?
In this post, I'll walk you through how I set up a random ASCII-art Neofetch experience — including sharing some of my own art and how to make your own quick and easy!
1. Generating the ASCII Art 🖼️
First, I wanted original artwork instead of the default distribution logos.
I used a text-to-image generation model to create images based on prompts I liked. Then, I converted these images to ASCII using the tool ascii-image-converter.
Example:
ascii-image-converter ~/path/to/picture/ascii-image.png -C -W 70 --save-txt .After generating the .txt, I hand-tweaked the ASCII to clean it up and enhance certain features. It's very rare that the image to ASCII converter will get it perfect, but it does the vast majority of work and after fixing the inconsistencies and blemishes, you can start focus on the details.
2. Setting up the Randomized Bash Script
I thought the static ASCII art was a bit boring. Like my wallpaper, I want it to randomly go through a selection of my favorite wallpaper art.
To make Neofetch display a random ASCII file each time, I created a wrapper script called neofetch-rand.
Here's the full script:
#!/bin/bash

ascii_files=(
	"$HOME/.config/neofetch/merlin.txt"
	"$HOME/.config/neofetch/torii-sun.txt"
	"$HOME/.config/neofetch/torii.txt"
	"$HOME/.config/neofetch/skull.txt"
	"distro"
)

ascii_distro=(
	"LinuxMint"
	"BlackArch"
)

rand_ascii="${ascii_files[RANDOM % ${#ascii_files[@]}]}"
rand_distro="${ascii_distro[RANDOM % ${#ascii_distro[@]}]}"

if [[ "$rand_ascii" == *"torii.txt" ]]; then
	ascii_colors=(1 9 0 2)
elif [[ "$rand_ascii" == *"torii-sun.txt" ]]; then
	ascii_colors=(3 1 0 2)
elif [[ "$rand_ascii" == *"skull.txt" ]]; then
	ascii_colors=(0 8)
elif [[ "$rand_ascii" == *"merlin.txt" ]]; then
	ascii_colors=(12 14 11 11 11)
elif [[ "$rand_ascii" == "distro" ]]; then
	if [[ "$rand_distro" == "Mac" ]]; then
		ascii_colors=(1 9 6 14 4 12)
	elif [[ "$rand_distro" == "BlackArch" ]]; then
		ascii_colors=(14 12 1 2)
	else
		ascii_colors=(12 14 11 11 11)
	fi
	rand_ascii=""
else
	ascii_colors=(12 14 11 11 11)
fi

neofetch --ascii_distro "$rand_distro" --ascii_colors "${ascii_colors[@]}" --source "$rand_ascii"
Now, these colors are based on your system theme's color palette. I have my own custom palette of 16 colors mapped to numbers 0-15 which are precisley the values represented by the integers you see in the lists bound to the ascii_colors variable. You'll want to change these values for yourself and customize based on the art.
Installation:
sudo cp neofetch-rand /bin/neofetch-rand
sudo chmod +x /bin/neofetch-rand
Now it's ready to run with by executing the neofetch-rand command in your terminal!
3. How Color Customization Works
Neofetch lets you define colors inside your ASCII art using placeholders like ${c1}, ${c2}, etc.
Inside your .txt files, you can set sections to different colors dynamically based on what --ascii_colors flags you pass.
Example section from my customized ASCII:
${c1}    /\
${c2}   /__\
${c1}  /\  /\
${c2} /__\/__\
The colors passed in the bash script correspond to your terminal's 16-color palette.
4. Making it Convenient with Aliases
Finally, I added an alias to my .bashrc or .zshrc:
alias nf='neofetch-rand'Reload your shell or run source .zshrc and then you can run it with nf. A new, randomly chosen ASCII art will greet you each time!
5. My Custom ASCII Art
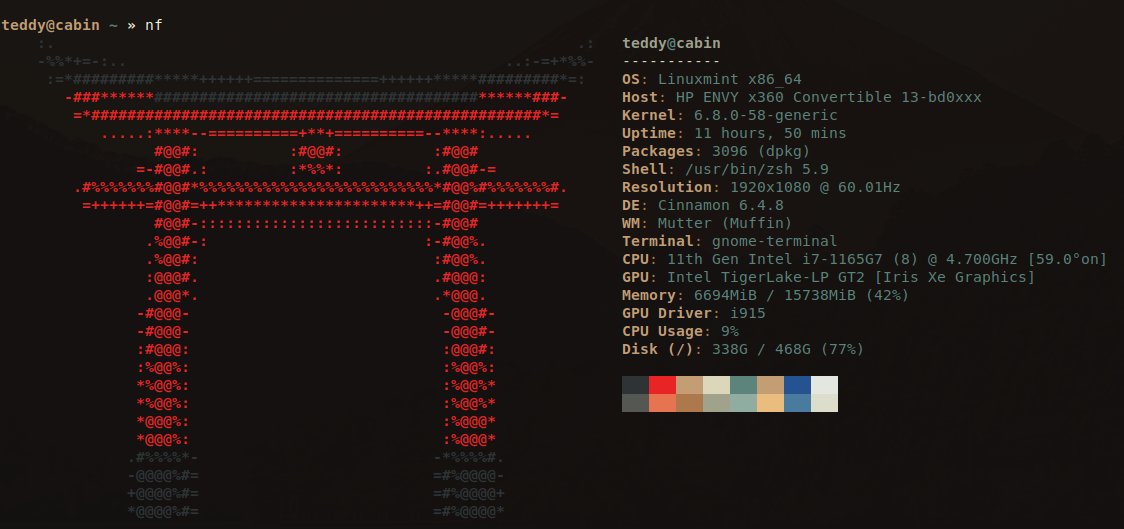
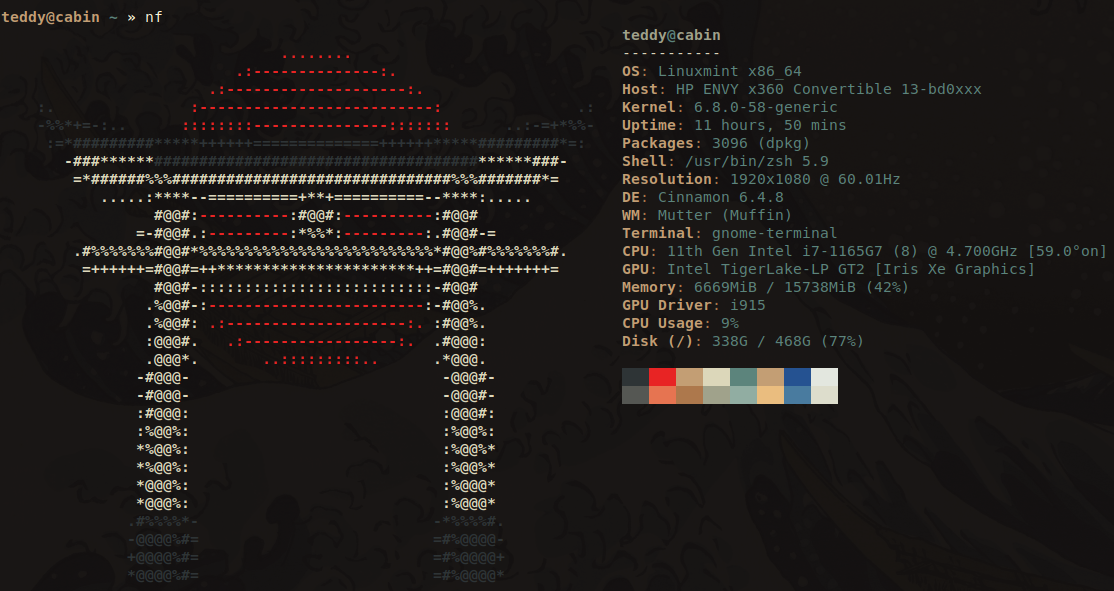
Here are some snippets rom the art I use and created myself:
Torii
    ${c3}:.                                                          ${c3}.:
    ${c3}-%%*+=-:..                                          ${c3}..:-=+*%%-
     ${c3}:=*#########*****++++++==============++++++*****#########*=:
       ${c1}-###******${c3}####################################${c1}******###-
        =*##################################################*=
           .....:****--==========+**+==========--****:.....
                 #@@#:          :#@@#:          :#@@#
               =-#@@#.:         :*%%*:         :.#@@#-=
        .#%%%%%%%#@@#*%%%%%%%%%%%%%%%%%%%%%%%%%%*#@@%#%%%%%%%#.
         =++++++=#@@#=++**********************++=#@@#=+++++++=
                 #@@#-::::::::::::::::::::::::::-#@@#
                .%@@#-:                        :-#@@%.
                .%@@#:                          :#@@%.
                :@@@#.                          .#@@@:
                .@@@*.                          .*@@@.
               -#@@@-                            -@@@#-
               -#@@@-                            -@@@#-
               :#@@@:                            :@@@#:
               :%@@%:                            :%@@%:
               *%@@%:                            :%@@%*
               *%@@%:                            :%@@%*
               *@@@%:                            :%@@@*
               *@@@%:                            :%@@@*
              ${c3}.#%%%%*-                          -*%%%%#.
              -@@@@%#=                          =#%@@@@-
              +@@@@%#=                          =#%@@@@+
              *@@@@%#=                          =#%@@@@*
Torii with Sun
${c2}
                               ........
                          .:--------------:.
                       .:--------------------:.
    ${c3}:.               ${c2}:--------------------------:               ${c3}.:
    ${c3}-%%*+=-:..      ${c2}::::::::---------------:::::::      ${c3}..:-=+*%%-
     ${c3}:=*#########*****++++++==============++++++*****#########*=:
       ${c1}-###******${c3}####################################${c1}******###-
        ${c1}=*######%%%###############################%%%#######*=
           .....:****--==========+**+==========--****:.....
                 #@@#:${c2}----------${c1}:#@@#:${c2}----------${c1}:#@@#
               =-#@@#.:${c2}---------${c1}:*%%*:${c2}---------${c1}:.#@@#-=
        .#%%%%%%%#@@#*%%%%%%%%%%%%%%%%%%%%%%%%%%*#@@%#%%%%%%%#.
         =++++++=#@@#=++**********************++=#@@#=+++++++=
                 #@@#-::::::::::::::::::::::::::-#@@#
                .%@@#-:${c2}------------------------${c1}:-#@@%.
                .%@@#: ${c2}.:--------------------:. ${c1}:#@@%.
                :@@@#.   ${c2}.:-----------------:.  ${c1}.#@@@:
                .@@@*.       ${c2}..:::::::::..      ${c1}.*@@@.
               -#@@@-                            -@@@#-
               -#@@@-                            -@@@#-
               :#@@@:                            :@@@#:
               :%@@%:                            :%@@%:
               *%@@%:                            :%@@%*
               *%@@%:                            :%@@%*
               *@@@%:                            :%@@@*
               *@@@%:                            :%@@@*
              ${c3}.#%%%%*-                          -*%%%%#.
              -@@@@%#=                          =#%@@@@-
              +@@@@%#=                          =#%@@@@+
              *@@@@%#=                          =#%@@@@*
If these look wonky, it's because the color variables that neofetch parses (${ci}) are removed. When printed, these look as they should.
6. Wrapping Up
Customizing Neofetch can be a fun personalization to your system, and you can use it to brush up on some bash scripting basics.
Thanks for reading! If you try this yourself, I'd love to see your ASCII setups.